This post includes affiliate marketing links. While these links won’t cost you any additional money, we may earn from qualifying purchases.
A few weeks ago, we shared Brian’s Internet Set-Up. What wasn’t included in that post was how we amplify our cell signal from time to time with a simple DIY setup. While technically not a cell phone booster, this DIY project has helped increase our cell signal by about 10% and sometimes makes the difference between watching a pixilated version of our favorite shows and a clear, crisp picture.
For this project we used:

Step by step instructions:
We started our DIY RV cell phone booster with two Proxicast High Gain Omni-Directional Outdoor Pole/Wall Mount Antennas. These antennas will help capture cell signals from all major cellular service providers in the states and many other providers. Additionally, they are compatible with many LTE devices, including the weBoost and Netgear Nighthawk (with appropriate pigtails) that we use. Since they are weather and impact resistant, they are perfect antennas for us to use outdoors. Why 2? Without getting too technical, LTE signal uses multiple bands. For best optimization, you need at least 2 antennas.
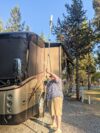
Next, we needed a pole to mount the antenna to. Since we needed it to fit in the basement bay of our motorhome with the antenna attached, we opted for a 24-foot telescoping pole. While it’s advertised for paint rolling, lightbulb changing, and gutter cleaning, this pole has served us well. And it is much cheaper than other poles specifically built for antenna use which cost hundreds of dollars for a pole!
Of course, you’ll need to run cable from the antennas into your router. The Proxicast antenna specifically calls for a 50-OHM coaxial cable. This cable has an SMA connection for connecting to many routers. Also, we needed to add pigtail connectors to connect the cables directly to our Netgear Nighthawk because of our setup.
How do you secure a pole to your RV or motorhome? We didn’t want to make permanent holes or cuts in our rig, so we opted for two heavy-duty suction cups capable of attaching to fiberglass or any non-porous surface. In extreme weather conditions, we typically take the antenna down or lower them. But these suction cups have withstood some powerful gusts of over 40 mph.
Again, since we didn’t want to cut holes in our rig, the only thing left was finding a window to run the cable through and a way to block the opening from weather or insects coming into our RV. We accomplished this with a piece of bulk foam and cut the foam to fill in our open toll window space. We cut a hole in the foam just large enough to run the cable through to connect to our device(s). Some people opt to run the cables through a slideout opening. In our case, doing this would have caused the cables to get pinched, which we didn’t want to do.
This simple setup helps us boost our signal strength in no time! We leave the cable in the foam and tuck that away in the corner behind our television/monitor until we need it again. We can pack up the pole with the cable disconnected from the antenna and put it away without issue.

Think you’ve got a better solution?
If you think you have a better solution, we’d love to hear from you! Shoot us an email or comment on this post, please! One thing that is great about this RV community is how we all learn from each other.


