This isn’t about making an epic charcuterie board. This is about having a simple, well-rounded meat and cheese board. You know, something a bit more appropriate for those of us living in an RV full-time. That’s not to say if you don’t live in an RV full-time you won’t enjoy this. But my thoughts take into account some of the limitations of the lifestyle.
- Select cheese(s).
- Purchase cheeses made from different types of milk. I like to have at least one each cow, sheep, and goat.
- Select different categories of cheese, i.e., fresh, bloomy rind, washed rind, blue, semi-hard, hard.
- In preparation for serving, some cheeses are best-served whole, while others are better suited to be sliced, cubed, shaved, etc. I like to have different shapes of cheese on the board. Keep in mind that cheese ages from the outside in, so when you cut the cheese, try to cut in a way that incorporates the outside and the inside.
- Select meat(s).
- Purchase a combination of meats from cured meats to pâté. I prefer a combination of whole muscle cured meats, i.e., prosciutto, coppa, and lomo and sausage. If you’re including pâtés, consider using pâtés made from different meats and a combination of textures with country and mousse pâtés.
- Select different spice levels or flavors.
- When serving, simplify the way someone can pick it up. For prosciutto, this might mean rolling loosely around a finger to place on the tray. A slice of salami might be best folded in quarters and placed with the fold down.
- Include a vegetable(s). This can be as simple as some olives, but might also include some cornichons, artichokes, roasted peppers, pickled peppers, or a selection of all of these.
- Include a fruit(s). Dried fruits like cranberries, cherries, apricots, and figs work well, but you might also include thinly sliced pears or apples (don’t forget a squeeze of lemon to keep them from oxidizing.)
- Add texture to your board with something(s) crunchy, like nuts, crackers, pretzels, breadsticks, or sesame sticks.
In addition to these 5 steps, be sure to plan ahead. We aren’t always near a premium grocery or specialty store with a good selection of cheeses or meats. When we are, I like to pick up the things that I want for a good board. Trust me. You will not find great cheese, prosciutto, or any of the other fancy accouterments when you’re out in some of the remote areas that we like to camp in.
Don’t forget to serve at room temperature. The cheese, in particular, will taste much better at room temperature as cold mutes the flavor. (Cheese is easier to cut when cold but tastier when room temperature, so this is always first on my list of things as I prepare the board.)
Wondering what wines are best to serve with a charcuterie board? As always, this is best served with a beverage that you like! If you prefer grape Koolaid to wine, that’s what will taste best to you. But, if you’re like me and you like a wide range of wine, I suggest wines that have good acidity, a little fruitiness, and a bit of weight to go with them. For white wines, try Riesling, Chenin Blanc, Verdejo, Gruner Veltliner, etc. Look for red wines that are lighter in body, with good acidity and mild tannins, like Gamay, Frappato, Barbera, or a very light Pinot Noir. Not sure how to pick between white and red wines for this? Almost any dry rosé will go well with a charcuterie board.
My final suggestion? Experiment with different bites and flavors. Notice how the wine tastes different after an olive, a piece of cheese, or a slice of meat. It’s one of the fun things about a charcuterie board. Each bite and each sip is different.

Related Posts
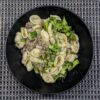
Instant Pot Sausage, Broccoli, and Orecchiette Pasta
Since we don't have a dishwasher and we handwash everything,…

Make-Ahead Meal: Tuna Nicoise Potato Salad
In my ongoing quest for delicious make-ahead meals that are…